Phát triển ứng dụng IoT
IoT applications development (M2M app development)
Mô tả học phần
Đây là học phần hướng người học tiếp cận đến xây dựng và phát triển ứng dụng thông minh đáp ứng nhu cầu xã hội hiện nay. Học phần có 5 chương, tập trung giới thiệu về các thiết bị cảm ứng IoT, các giao thức, phương pháp quản lý cũng như cấu hình kết nối và các ứng dụng thông minh của IoT trong đời sống xã hội. Đặc biệt tập trung giới thiệu Chip Wifi ESP8266 để kết nối với Server, gửi - nhận và thực thi các lệnh từ Server. Học phần này cũng nêu các bước xây dựng ứng dụng thông minh phổ biến đáp ứng nhu cầu sử dụng hàng ngày.
Mục tiêu học phần
Về kiến thức
- Biết kiến thức về các thành phần và ứng dụng thông minh của IoT.
- Hiểu vai trò, cách sử dụng và cấu hình các loại cảm biến IoT.
- Hiểu ý nghĩa, cách sử dụng các giao thức và kết nối Server qua Chip Wifi ESP8266.
Về kỹ năng
- Thành thạo cài đặt các phần mềm mô phỏng các thiết bị IoT, phần mềm ứng dụng mô hình IoT.
- Trình bày và giải thích các mô hình lắp đặt ứng dụng trên phần mềm mô hình và phần mềm ứng dụng thực.
- Vận dụng lý thuyết IoT xây dựng các phần mềm ứng dụng IoT.
Yêu cầu cho người học và kiến thức cần đạt
Nhiệm vụ
- Nhiệm vụ 1: Đọc tài liệu và tìm hiểu, nghiên cứu các thiết bị IoT được giảng viên giao.
- Nhiệm vụ 2: Phối hợp một số thành viên trong lớp, đề xuất hướng xây dựng một thiết bị thông minh nhỏ phục vụ đời sống;
- Nhiệm vụ 3: Tham dự đầy đủ các giờ giảng của giảng viên và các buổi tổ chức thảo luận dưới sự hướng dẫn và điều khiển của giảng viên theo quy chế;
Kiến thức cần đạt
- Có kiến thức về các thông tin về các chuẩn phổ biến cho IoT gồm HTTP, các giao thức, chip wifi ESP8266; Đồng thời, có kiến thức về một số thông tin thiết bị IoT và các phương pháp sử dụng chúng trong một số ứng dụng thông minh phổ biến trong thực tế.
- Có kiến thức về việc xây dựng mô hình IoT trên phần mềm mô phỏng;
- Có kiến thức về việc lập trình gửi - nhận thông tin và điều khiển các thiết bị IoT.
Kỹ năng
- Có kĩ năng khảo sát, nhận diện, đánh giá tính năng các thiết bị IoT.
- Có kĩ năng kết nối các thiết bị để vận dụng xây dựng ứng dụng thông minh nhờ các thiết bị IoT.
Nội dung môn học
Chương 1. KIẾN THỨC CƠ BẢN VỀ INTERNET OF THINGS (IOT)
- 1.1. Khái niệm Internet of Things
- 1.2. Hệ thống Internet of Things
- 1.3. Những ứng dụng thực tế trong cuộc sống
Chương 2. CẢM BIẾN IOT
- 2.1. Cảm biến ESP8266 Wifi
- 2.2. Cảm biến nhiệt độ
- 2.3. Cảm biến ảnh sáng
- 2.4. Cảm biến độ ẩm
Chương 3. VI MẠCH NHÚNG ARDUINO
- 3.1. Các đặc điểm và lợi ích khi sử dụng Arduino
- 3.1.1. Giới thiệu về Arduino
- 3.1.2. Các đặc điểm của Arduino
- 3.1.3. Lợi ích khi sử dụng Arduino
- 3.2. Arduino cho ESP8266 và bo mạch ESP8266 Wifi Uno
- 3.3. Thực hiện sản phẩm trên Arduino IDE
- 3.3.1. Arduino IDE và các công cụ
- 3.3.2. Cài đặt thư viện Arduino
- 3.3.3. Sử dụng USB CDC Driver
- 3.3.4. Chọn bo mạch ESP8266 Wifi Uno trong Arduino IDE
- 3.3.5. Nạp chương trình xuống bo mạch dùng Arduino IDE
- 3.3.6. Xuất thư viện firmware trong Arduino IDE
Chương 4. DỰ ÁN ESP8266 WIFI
- 4.1. Chế độ Wifi Station
- 4.1.1. Các kiến thức về Wifi
- 4.1.2. Kết nối vào mạng Wifi nội bộ
- 4.1.3. Sử dụng WifiMulti
- 4.2. Http Client
- 4.2.1. Giao thức http
- 4.2.2. Json
- 4.2.3. Ứng dụng xem giá Bitcoin
- 4.3. Chế độ Wifi Access Point
- 4.3.1. ESP8266 hoạt động ở chế độ Access Point
- 4.3.2. Khởi tạo mạng Wifi sử dụng ESP8266
- 4.4. Web Server
- 4.4.1. Khái niệm về Web Server
- 4.4.2. HTML – JavaScript – CSS
- 4.4.3. Ứng dụng điều khiển đèn LED thông qua Webserver
- 4.4.4. ESP8266 Web Server
- 4.4.5. Kết hợp Wifi AP và Web Server
- 4.5. Trao đổi dữ liệu giữa hai ESP8266
Chương 5. DỰ ÁN ĐỌC CẢM BIẾN DHT11 VÀ GỬI VỀ SERVER
- 5.1. Thiết kế ứng dụng
- 5.1.1. Yêu cầu và phân tích ứng dụng
- 5.1.2. Cảm biến DHT 11 và chuẩn dữ liệu OneWire
- 5.1.3. Thực hiện ứng dụng
- 5.2. Mã lệnh trên ESP8266
- 5.2.1. Chuẩn bị
- 5.2.2. Mã lệnh ESP8266
- 5.3. Ứng dụng dùng ESP8266 như một Web Server
Slides
Phát triển ứng dụng IoT - Slides
Group thảo luận
https://www.facebook.com/groups/1289172601825441
Bài tập
Bài 1. Bật tắt LED
1
2
3
4
5
6
7
8
9
10
11
12
13
14
15
16
17
int LED1 = 2;      // Assign LED1 to pin GPIO2
int LED2 = 16;     // Assign LED1 to pin GPIO16

void setup() {
  // initialize GPIO2 and GPIO16 as an output
  pinMode(LED1, OUTPUT);
  pinMode(LED2, OUTPUT);
}
// the loop function runs forever
void loop() {
    digitalWrite(LED1, LOW);     // turn the LED off
    digitalWrite(LED2, HIGH);
    delay(1000);                // wait for a second
    digitalWrite(LED1, HIGH);  // turn the LED on
    digitalWrite(LED2, LOW);
    delay(3000);               // wait for a second
}
Bài 2. Tạo ESP8266 ở Access Point mode
1
2
3
4
5
6
7
8
9
10
11
12
13
14
15
16
17
18
19
20
#include <ESP8266WiFi.h>

const char *password = "123456";

void setup() {
  Serial.begin(115200);
  Serial.print("Configuring access point...");
  char ssid[64];
  sprintf(ssid, "AP-%06X", ESP.getChipId());
  WiFi.softAP(ssid, password);

  IPAddress myIP = WiFi.softAPIP();
  Serial.print("AP IP address: ");
  Serial.println(myIP);
}

void loop() {
  Serial.printf("Stations connected = %d\n", WiFi.softAPgetStationNum());
  delay(3000);
}
Bài 3. Tạo ESP8266 ở Station mode (nối vào một mạng Wi-Fi có sẵn)
1
2
3
4
5
6
7
8
9
10
11
12
13
14
15
16
17
18
19
20
21
22
23
24
25
#include <ESP8266WiFi.h>                // Thư viện dùng để kết nối WiFi của ESP8266

const char* ssid = "LiverpoolFC";         // Tên của mạng WiFi mà bạn muốn kết nối đến
const char* password = "Anfield";   // Mật khẩu của mạng WiFi

void setup() {
  Serial.begin(115200);                 // Khởi tạo kết nối Serial để truyền dữ liệu đến máy tính

  WiFi.begin(ssid, password);           // Kết nối vào mạng WiFi
  Serial.print("Connecting to ");
  Serial.print(ssid);

  // Chờ kết nối WiFi được thiết lập
  while (WiFi.status() != WL_CONNECTED) {
    delay(1000);
    Serial.print(".");
  }

  Serial.println("\n");
  Serial.println("Connection established!");
  Serial.print("IP address: ");
  Serial.println(WiFi.localIP());       // Show IP address
}

void loop() {}
Bài 4. Chạy mDSN với ESP8266
mDNS (Multicast Domain Name System) mDNS sử dụng tên miền với đuôi là .local, ví dụ http: //liverpoolfc.local . Nếu máy tính của bạn cần gửi yêu cầu đến một tên miền có đuôi là .local, nó sẽ gửi một truy vấn multicast đến tất cả các thiết bị khác trên mạng LAN có hỗ trợ mDNS, thiết bị sẽ tự nhận dạng tên miền của chính mình. Sau đó thiết bị có tên phù hợp sẽ phản hồn bằng cách gửi một multicast khác kèm địa chỉ IP của nó. Đến lúc này máy tính của bạn biết địa chỉ IP của thiết bị và có thể gửi các yêu cầu bình thường.
Chú ý: giao thức MDNS được hỗ trợ sẵn trên các hệ điều hành Linux, MacOS, và Windows 10 (hầu hết các bản), còn nếu máy chạy hệ điều hành cũ (Windows 8, 7, XP,…) hoặc Windows 10 đã lâu chưa update, không bản quyền… thì có thể không hỗ trợ mDNS, dẫn đến việc ping đến tên .local bị lỗi, trong trường hợp đó cài đặt thêm file sau: BonjourPSSetup.exe (khởi động lại máy sau khi cài.)
1
2
3
4
5
6
7
8
9
10
11
12
13
14
15
16
17
18
19
20
21
22
23
24
25
26
27
28
29
30
31
32
33
34
35
36
37
#include <ESP8266WiFi.h>        // Include the Wi-Fi library
#include <ESP8266WiFiMulti.h>   // Include the Wi-Fi-Multi library
#include <ESP8266mDNS.h>        // Include the mDNS library

ESP8266WiFiMulti wifiMulti;     // Create an instance of the ESP8266WiFiMulti class, called 'wifiMulti'

void setup() {
  Serial.begin(115200);         // Start the Serial communication to send messages to the computer
  delay(10);
  Serial.println('\n');

  wifiMulti.addAP("ssid_from_AP_1", "your_password_for_AP_1");   // add Wi-Fi networks you want to connect to
  wifiMulti.addAP("ssid_from_AP_2", "your_password_for_AP_2");
  wifiMulti.addAP("Liverpool FC", "anfield");

  Serial.println("Connecting ...");
  int i = 0;
  while (wifiMulti.run() != WL_CONNECTED) { // Wait for the Wi-Fi to connect: scan for Wi-Fi networks, and connect to the strongest of the networks above
    delay(1000);
    Serial.print(++i); Serial.print(' ');
  }
  Serial.println('\n');
  Serial.print("Connected to ");
  Serial.println(WiFi.SSID());              // Tell us what network we're connected to
  Serial.print("IP address:\t");
  Serial.println(WiFi.localIP());           // Send the IP address of the ESP8266 to the computer

  if (MDNS.begin("esp8266")) {              // Start the mDNS responder for esp8266.local
    Serial.println("mDNS responder started");
  } else {
    Serial.println("Error setting up MDNS responder!");
  }
}

void loop() {
  MDNS.update();
}
Bài 5. Tạo Webserver
1
2
3
4
5
6
7
8
9
10
11
12
13
14
15
16
17
18
19
20
21
22
23
24
25
26
27
28
29
30
31
32
33
34
35
36
37
38
39
40
41
42
43
44
45
46
47
48
49
50
51
52
53
54
55
56
57
58
59
60
61
62
63
64
65
66
67
68
69
70
71
72
73
74
75
76
77
78
79
80
81
82
83
84
85
86
87
88
89
90
91
92
93
94
95
// Load Wi-Fi library
#include <ESP8266WiFi.h>

// Replace with your network credentials
const char* ssid     = "Liverpool FC";
const char* password = "anfield";

// Set web server port number to 80
WiFiServer server(80);

// Variable to store the HTTP request
String header;

// Current time
unsigned long currentTime = millis();
// Previous time
unsigned long previousTime = 0;
// Define timeout time in milliseconds (example: 2000ms = 2s)
const long timeoutTime = 2000;

void setup() {
  Serial.begin(115200);

  // Connect to Wi-Fi network with SSID and password
  Serial.print("Connecting to ");
  Serial.println(ssid);
  WiFi.begin(ssid, password);
  while (WiFi.status() != WL_CONNECTED) {
    delay(500);
    Serial.print(".");
  }
  // Print local IP address and start web server
  Serial.println("");
  Serial.println("WiFi connected.");
  Serial.println("IP address: ");
  Serial.println(WiFi.localIP());
  server.begin();
}

void loop() {
  WiFiClient client = server.available();   // Listen for incoming clients

  if (client) {                             // If a new client connects,
    Serial.println("New Client.");          // print a message out in the serial port
    String currentLine = "";                // make a String to hold incoming data from the client
    currentTime = millis();
    previousTime = currentTime;
    while (client.connected() && currentTime - previousTime <= timeoutTime) { // loop while the client's connected
      currentTime = millis();
      if (client.available()) {             // if there's bytes to read from the client,
        char c = client.read();             // read a byte, then
        Serial.write(c);                    // print it out the serial monitor
        header += c;
        if (c == '\n') {                    // if the byte is a newline character
          // if the current line is blank, you got two newline characters in a row.
          // that's the end of the client HTTP request, so send a response:
          if (currentLine.length() == 0) {
            // HTTP headers always start with a response code (e.g. HTTP/1.1 200 OK)
            // and a content-type so the client knows what's coming, then a blank line:
            client.println("HTTP/1.1 200 OK");
            client.println("Content-type:text/html");
            client.println("Connection: close");
            client.println();

            // Display the HTML web page
            client.println("<!DOCTYPE html><html>");
            client.println("<head><meta name=\"viewport\" content=\"width=device-width, initial-scale=1\">");
            client.println("<body><h1>ESP8266 Web Server</h1>");
            client.println("<h2>Hello IoT 2</h1>");
            client.println("<h3>Hello IoT 3</h1>");
            client.println("<h4>Hello IoT 4</h4>");
            client.println("<h5>Hello IoT 5</h5>");
            client.println("<marquee>Goodbye</marquee>");
            client.println("</body></html>");

            // The HTTP response ends with another blank line
            client.println();
            // Break out of the while loop
            break;
          } else { // if you got a newline, then clear currentLine
            currentLine = "";
          }
        } else if (c != '\r') {  // if you got anything else but a carriage return character,
          currentLine += c;      // add it to the end of the currentLine
        }
      }
    }
    // Clear the header variable
    header = "";
    // Close the connection
    client.stop();
    Serial.println("Client disconnected.");
    Serial.println("");
  }
}
Bài 6. Tạo Webserver có tương tác với đèn LED trên ESP8266 bằng cách thêm code vào Bài 5 ở trên như sau:
Thêm đoạn code sau vào dòng 20 trước hàm setup():
1
2
3
4
5
// Auxiliar variables to store the current output state
String outputState = "off";

// Assign output variables to GPIO pins
const int output = 2;
Thêm đoạn code sau vào dòng 23, sau Serial.begin() :
1
2
3
4
// Initialize the output variables as outputs
pinMode(output, OUTPUT);
// Set outputs to LOW
digitalWrite(output, LOW);
Thêm đoạn code sau vào dòng 64, sau client.println():
1
2
3
4
5
6
7
8
9
// turns the GPIOs on and off
if (header.indexOf("GET /5/on") >= 0) {
  outputState = "on";
  digitalWrite(output, HIGH);
} else if (header.indexOf("GET /5/off") >= 0) {
  Serial.println("GPIO 5 off");
  outputState = "off";
  digitalWrite(output, LOW);
}
Nạp lại chương trình và chạy
Bài 7. Tạo Webserver có nút bật/tắt LED (bài hoàn chỉnh)
1
2
3
4
5
6
7
8
9
10
11
12
13
14
15
16
17
18
19
20
21
22
23
24
25
26
27
28
29
30
31
32
33
34
35
36
37
38
39
40
41
42
43
44
45
46
47
48
49
50
51
52
53
54
55
56
57
58
59
60
61
62
63
64
65
66
67
68
69
70
71
72
73
74
75
76
77
78
79
80
81
82
83
84
85
86
#include <ESP8266WiFi.h>

const char* ssid = "Ngo-Hai-Anh";
const char* password = "ngohaianh";

int LED1 = 2;
int LED2 = 16; // GPIO16 (D0)

WiFiServer server(80);

void setup(){
  Serial.begin(115200);
  pinMode(LED1, OUTPUT);
  pinMode(LED2, OUTPUT);
  digitalWrite(LED1, LOW);
  digitalWrite(LED2, HIGH);
  Serial.print("Connecting to the Newtork");
  WiFi.begin(ssid, password);
  while (WiFi.status() != WL_CONNECTED)
  {
    delay(500);
    Serial.print(".");
  }
  Serial.println("WiFi connected");
  server.begin();
  Serial.println("Server started");
  Serial.print("IP Address of network: "); // will IP address on Serial Monitor
  Serial.println(WiFi.localIP());
  Serial.print("Copy and paste the following URL: https://");
  Serial.print(WiFi.localIP());
  Serial.println("/");
}

void loop(){
  WiFiClient client = server.available();
  if (!client){
    return;}

  Serial.println("Waiting for new client");
  while(!client.available())
  {
    delay(1);
  }
  String request = client.readStringUntil('\r');
  Serial.println(request);
  client.flush();

  int value = HIGH;
  if(request.indexOf("/LED=ON") != -1){

    digitalWrite(LED1, LOW); // Turn LED ON
    digitalWrite(LED2, HIGH);
    value = LOW;
  }

  if(request.indexOf("/LED=OFF") != -1){

    digitalWrite(LED1, HIGH); // Turn LED OFF
    digitalWrite(LED2, LOW);
    value = HIGH;
  }

//*------------------HTML Page Code---------------------*//

  client.println("HTTP/1.1 200 OK"); //
  client.println("Content-Type: text/html");
  client.println("");
  client.println("<!DOCTYPE HTML>");
  client.println("<html>");
  client.print(" CONTROL LED: ");
  if(value == HIGH){
    client.print("OFF");
  }
  else
  {
    client.print("ON");
  }
  client.println("<br><br>");
  client.println("<a href=\"/LED=ON\"\"><button>ON</button></a>");
  client.println("<a href=\"/LED=OFF\"\"><button>OFF</button></a><br />");
  client.println("</html>");

  delay(1);
  Serial.println("Client disonnected");
  Serial.println("");
}
Bài 8. Webserver đọc nhiệt độ và độ ẩm
1
2
3
4
5
6
7
8
9
10
11
12
13
14
15
16
17
18
19
20
21
22
23
24
25
26
27
28
29
30
31
32
33
34
35
36
37
38
39
40
41
42
43
44
45
46
47
48
49
50
51
52
53
54
55
56
57
58
59
60
61
62
63
64
65
66
67
68
69
70
71
72
73
74
75
76
77
78
79
80
81
82
83
84
85
86
87
88
89
90
91
92
93
94
95
96
97
98
99
100
101
102
103
104
105
106
107
108
109
110
111
112
113
114
115
116
117
118
119
120
121
122
123
124
125
126
127
128
129
130
131
132
133
134
135
136
137
138
139
140
141
142
143
144
145
146
147
148
149
150
151
152
153
154
155
156
157
158
159
160
161
162
163
164
165
166
167
168
169
170
171
/*********
- Installing the 'DHT sensor library' and 'Adafruit Unified Sensor' from Adafruit for ESP8266.
- ESPAsyncWebServer library: https://github.com/me-no-dev/ESPAsyncWebServer/archive/master.zip
- ESPAsync TCP Library: https://github.com/me-no-dev/ESPAsyncTCP/archive/master.zip
*********/
#include <Arduino.h>
#include <ESP8266WiFi.h>
#include <Hash.h>
#include <ESPAsyncTCP.h>
#include <ESPAsyncWebServer.h>
#include <Adafruit_Sensor.h>
#include <DHT.h>
// Replace with your network credentials
const char* ssid = "YOUR_SSID";
const char* password = "YOUR_PASSWORD";
#define DHTPIN 5 // Digital pin connected to the DHT sensor
#define DHTTYPE DHT11
DHT dht(DHTPIN, DHTTYPE);
// current temperature & humidity, updated in loop()
float t = 0.0;
float h = 0.0;
// Create AsyncWebServer object on port 80
AsyncWebServer server(80);
// Generally, you should use "unsigned long" for variables that hold time
// The value will quickly become too large for an int to store
unsigned long previousMillis = 0; // will store last time DHT was updated
// Updates DHT readings every 10 seconds
const long interval = 10000;
const char index_html[] PROGMEM = R"rawliteral(
<!DOCTYPE HTML><html>
<head>
<meta name="viewport" content="width=device-width, initial-scale=1">
<link rel="stylesheet" href="https://use.fontawesome.com/releases/v5.7.2/css/all.css" integrity="sha384-fnmOCqbTlWIlj8LyTjo7mOUStjsKC4pOpQbqyi7RrhN7udi9RwhKkMHpvLbHG9Sr" crossorigin="anonymous">
<style>
html {
font-family: Arial;
display: inline-block;
margin: 0px auto;
text-align: center;
}
h2 { font-size: 3.0rem; }
p { font-size: 3.0rem; }
.units { font-size: 1.2rem; }
.dht-labels{
font-size: 1.5rem;
vertical-align:middle;
padding-bottom: 15px;
}
</style>
</head>
<body>
<h2>ESP8266 DHT Server</h2>
<p>
<i class="fas fa-thermometer-half" style="color:#059e8a;"></i>
<span class="dht-labels">Temperature</span>
<span id="temperature">%TEMPERATURE%</span>
<sup class="units">°C</sup>
</p>
<p>
<i class="fas fa-tint" style="color:#00add6;"></i>
<span class="dht-labels">Humidity</span>
<span id="humidity">%HUMIDITY%</span>
<sup class="units">%</sup>
</p>
</body>
<script>
setInterval(function ( ) {
var xhttp = new XMLHttpRequest();
xhttp.onreadystatechange = function() {
if (this.readyState == 4 && this.status == 200) {
document.getElementById("temperature").innerHTML = this.responseText;
}
};
xhttp.open("GET", "/temperature", true);
xhttp.send();
}, 10000 ) ;
setInterval(function ( ) {
var xhttp = new XMLHttpRequest();
xhttp.onreadystatechange = function() {
if (this.readyState == 4 && this.status == 200) {
document.getElementById("humidity").innerHTML = this.responseText;
}
};
xhttp.open("GET", "/humidity", true);
xhttp.send();
}, 10000 ) ;
</script>
</html>)rawliteral";
// Replaces placeholder with DHT values
String processor(const String& var){
//Serial.println(var);
if(var == "TEMPERATURE"){
return String(t);
}
else if(var == "HUMIDITY"){
return String(h);
}
return String();
}
void setup(){
// Serial port for debugging purposes
Serial.begin(115200);
dht.begin();
// Connect to Wi-Fi
WiFi.begin(ssid, password);
Serial.println("Connecting to WiFi");
while (WiFi.status() != WL_CONNECTED) {
delay(1000);
Serial.println(".");
}
// Print ESP8266 Local IP Address
Serial.println(WiFi.localIP());
// Route for root / web page
server.on("/", HTTP_GET, [](AsyncWebServerRequest *request){
request->send_P(200, "text/html", index_html, processor);
});
server.on("/temperature", HTTP_GET, [](AsyncWebServerRequest *request){
request->send_P(200, "text/plain", String(t).c_str());
});
server.on("/humidity", HTTP_GET, [](AsyncWebServerRequest *request){
request->send_P(200, "text/plain", String(h).c_str());
});
// Start server
server.begin();
}
void loop(){
unsigned long currentMillis = millis();
if (currentMillis - previousMillis >= interval) {
// save the last time you updated the DHT values
previousMillis = currentMillis;
// Read temperature as Celsius (the default)
float newT = dht.readTemperature();
// Read temperature as Fahrenheit (isFahrenheit = true)
//float newT = dht.readTemperature(true);
// if temperature read failed, don't change t value
if (isnan(newT)) {
Serial.println("Failed to read from DHT sensor!");
}
else {
t = newT;
Serial.println(t);
}
// Read Humidity
float newH = dht.readHumidity();
// if humidity read failed, don't change h value
if (isnan(newH)) {
Serial.println("Failed to read from DHT sensor!");
}
else {
h = newH;
Serial.println(h);
}
}
}
Bài 9. Tạo webserver có thanh trượt tắt/bật đèn LED như code mẫu (chú ý cần cài các thư viện ESPAsyncTCP và ESPAsyncWebServer).
Lấy code từ đây: webserver.ino
Sau đó:
- Đọc code chú ý cách biểu thị các thẻ HTML, code Javascript
- Tự viết dần code phục vụ cho bài kiểm tra hôm sau (đề bài xem ở dưới phần BÀI KIỂM TRA)
BÀI KIỂM TRA
Xây dựng webserver trên ESP8266 có giao diện minh họa như Hình 1 dưới đây.
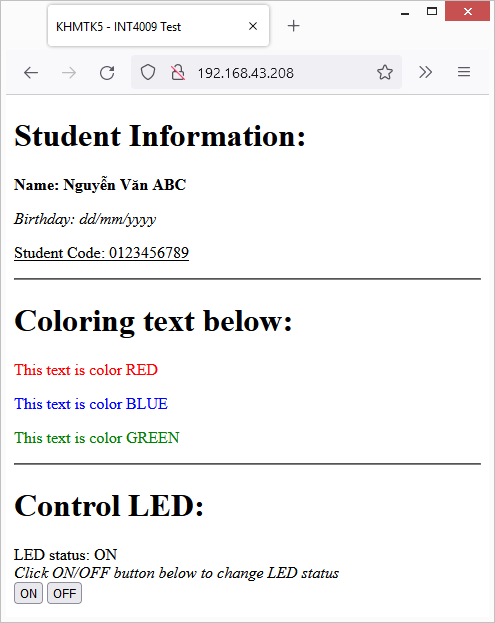
Hình 1. Giao diện webserver trên ESP8266.
Yêu cầu:
- Viết sẵn code
- Đến lượt ai thì cắm module ESP8266 vào và chạy, có tối đa 5 phút để sửa code.
- Giao diện web phải đúng như hình mẫu, kể cả màu sắc, format chữ đậm, nghiêng…
- Nộp bài bằng cách đặt tên file chứa code của mình dạng: MãSinhViên.ino (ví dụ Phạm Thế Anh sẽ đặt tên file là 19DH03001.ino) sau đó upload file của mình lên địa chỉ Google Drive sau: https://drive.google.com/drive/folders/1_AL5tbADgyLiDiusRu0xma9OjXjmPOGc?usp=sharing (chú ý phải dùng Gmail theo danh sách lớp mới có thể nộp bài, ai dùng email của người đó nộp chứ không được nộp hộ.)
Đoạn code dưới đây dùng để tham khảo, sinh viên có thể tự viết hoặc tham khảo từ bất kỳ đâu, miễn là đáp ứng yêu cầu ở trên.
1
2
3
4
5
6
7
8
9
10
11
12
13
14
15
16
17
18
19
20
21
22
23
24
25
26
27
28
29
30
31
32
33
34
35
36
37
38
39
40
41
42
43
44
45
46
47
48
49
50
51
52
53
54
55
56
57
58
59
60
61
62
63
64
65
66
67
68
69
70
71
72
73
74
75
76
77
78
79
80
81
82
83
84
85
86
87
88
89
90
91
92
93
94
95
96
97
98
99
#include <ESP8266WiFi.h>

const char* ssid = "YOUR_SSID";
const char* password = "YOUR_PASSWORD";

int LED1 = 2;
int LED2 = 16; // GPIO16 (D0)

WiFiServer server(80);

void setup() {
  Serial.begin(115200);
  pinMode(LED1, OUTPUT);
  pinMode(LED2, OUTPUT);
  digitalWrite(LED1, LOW);
  digitalWrite(LED2, HIGH);
  Serial.print("Connecting to the Newtork");
  WiFi.begin(ssid, password);
  while (WiFi.status() != WL_CONNECTED)
  {
    delay(500);
    Serial.print(".");
  }
  Serial.println("WiFi connected");
  server.begin();
  Serial.println("Server started");
  Serial.print("IP Address of network: "); // will IP address on Serial Monitor
  // Insert your code here
  Serial.print("Copy and paste the following URL: http://");
  // Insert your code here
  Serial.println("/");
}

void loop() {
  WiFiClient client = server.available();
  if (!client) {
    return;
  }

  Serial.println("Waiting for new client");
  while (!client.available())
  {
    delay(1);
  }
  String request = client.readStringUntil('\r');
  Serial.println(request);
  client.flush();

  int value = HIGH;
  if (request.indexOf("/LED=ON") != -1) {
    digitalWrite(LED1, LOW); // Turn LED ON
    digitalWrite(LED2, HIGH);
    value = ???; // choose value here
  }

  if (request.indexOf("/LED=OFF") != -1) {
    digitalWrite(LED1, HIGH); // Turn LED OFF
    digitalWrite(LED2, LOW);
    value = ???; // choose value here
  }

  //*------------------HTML Page Code---------------------*//

  client.println("HTTP/1.1 200 OK"); //
  client.println("Content-Type: text/html");
  client.println("");
  client.println("<!DOCTYPE HTML>");
  client.println("<html>");
  client.println("<meta charset=\"utf-8\">");
  client.println("<title>Your sample code</title>");
  client.println("</head>");
  client.println("<body>");
  client.println("Student Information:");
  client.println("Name: Nguyễn Văn ABC");
  client.println("Birthday: dd/mm/yyyy");
  client.println("Student Code: 0123456789");
  client.println("<h1>Coloring text below:</h1>");
  client.println("This text is color RED");
  client.println("This text is color BLUE");
  client.println("<p>This text is color GREEN</p>");
  client.println("<hr>");
  client.print("Control LED:");
  client.print("LED status: ");

  if (request.indexOf("/LED=OFF") != -1) {
    client.print("OFF");
  }
  else {
    client.print("ON");
  }
  client.print("<br><i>Click ON/OFF button below to change LED status</i>");
  client.println("<br><a href=\"/...\"\"><button>ON</button></a>");
  client.println("<a href=\"/...\"\"><button>OFF</button></a><br />");
  client.println("</body></html>");

  delay(1);
  Serial.println("Client disconnected");
  Serial.println("");
}
Bài 10. Quản lý Wi-Fi (Wi-Fi Manager) với ESP8266
Làm theo hướng dẫn tại đây: WiFiManager with ESP8266 – Autoconnect, Custom Parameter and Manage your SSID and Password
Các bài trước chúng ta đã thành thạo với việc kết nối Wi-Fi ở các mode Ad-hoc và Station, tuy nhiên khi kết nối cần đặt cứng (hard code) các thông tin như SSID và mật khẩu trong code Arduino. Bài hướng dẫn ở trên sẽ giúp kết nối vào một mạng Wi-Fi mà không cần sửa code Arduino.